When we caught a glimpse of the first official photos of the HTC Deluxe DLX a couple of days back , we were all but certain that it is only a matter of time before the quad-core beast with 1080p display makes its way to Europe. Therefore, the news from HTC Germany that the device won't make it to the Old Continent came as nothing short of a surprise.
As you can see in the translated message above, the 5" relative of the HTC J butterfly and the Verizon exclusive DROID DNA will not make it to Europe according to the message posted by HTC Germany's official Facebook account. There were no specific reasons given by HTC for the unfortunate occurrence.
Of course, the message might simply mean that the top shelf smartphone will make it under a different name and design to Europe. For HTC market share's sake, we hope it does.
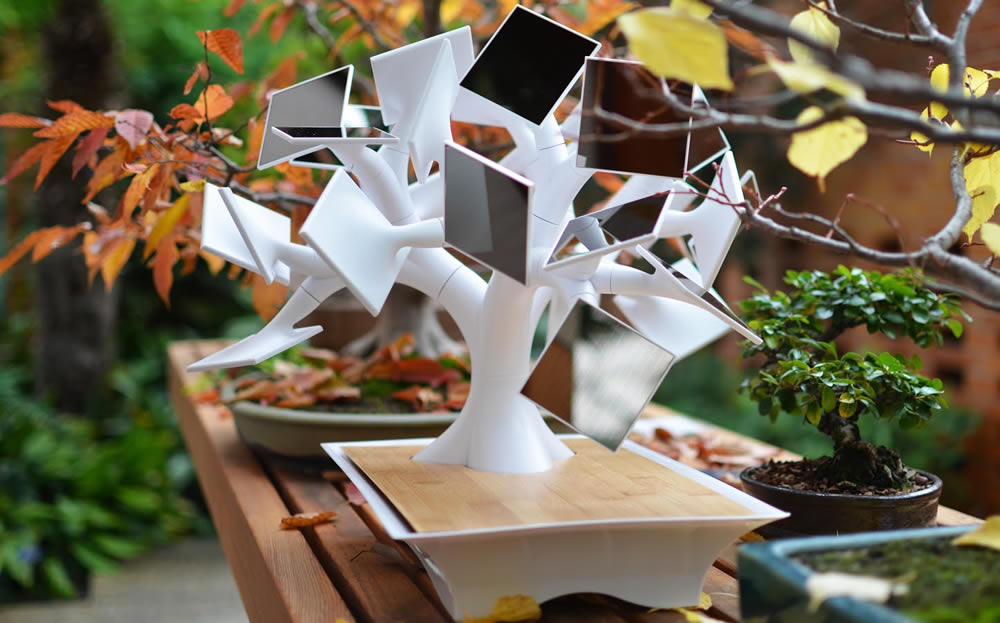
Possibly a great way to keep gadgets charged without increasing the power bill, the Electree+ solar charger combines cool design with green technology.
Recently launched on Kickstarter, the Electree+ is a small, bonsai-sized tree sculpture with solar panels attached to the ends of each white plastic branch. The 27 silicon solar panels on the Electree+ are adjustable based on the placement of the device and the direction of sunlight. Ideally, the device should be placed in an area that’s always in the path of sunlight during the day. According to the creator of the Electree+, it takes a day and a half to completely charge up the 14,000mAh internal battery to full power.
However, if someone simply wants to recharge their smartphone, the Electree+ can collect enough power to accomplish that task in approximately four hours.
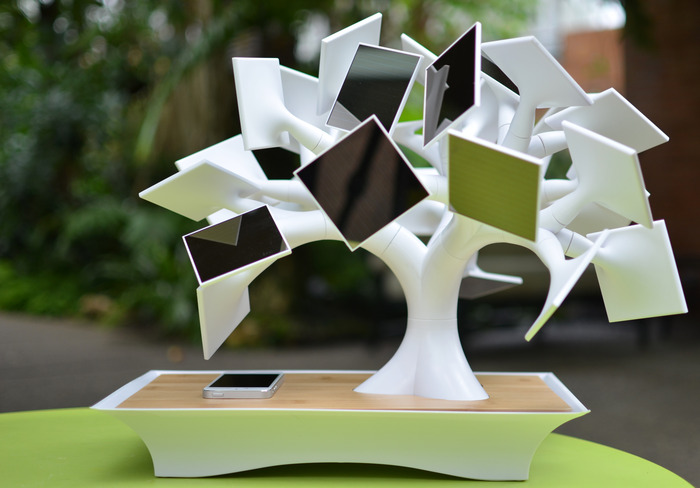
When the battery has a full charge, the Electree+ can recharge an Apple iPad 2 twice, a Samsung Galaxy S III seven times or an Apple iPhone 5 nine times before requiring more sunlight to fill up the battery again. The Electree+ comes with two USB ports for recharging digital cameras, tablets, laptops, smartphones, wireless headphones or any other form of portable electronics.
In addition, the Electree+ includes a Qi wireless charging zone underneath the tree to avoid having to search for the correct USB charging cable. iPhone owners can also take advantage of wireless charging assuming they purchase a Qi-enabled case. Beyond wireless charging, an Electree+ owner can upgrade the device with a NFC chip that can be used to trigger specific actions when a NFC-enabled smartphone is placed on the Electree+. For instance, when an Electree+ owner returns home from work and places the smartphone down on the charging area, a text message could automatically be sent to family members notifying everyone that they are home.
Within the base of the Electree+, the battery is stored underneath the baseplate and acts as the base of the tree design. After the plastic trunk is attached, the user attaches the three main branches that each house nine solar panels on smaller branches.
Since the two USB ports are underneath the baseplate, the creators of the Electree+ have designed the plate to allow for two USB cords to exit the device in order to reach a tablet or smartphone. According to the creator, the Electree+ will come in multiple colors and the baseplates will come in multiple colors.
Regarding the production schedule, the team building the Electree+ plans to use January 2013 to make small tweaks to the design before submitting the design specifications to a manufacturer based in the United States. During February and March, the team will be working to the manufacturer to perfect the prototype and complete the final molds before authorizing full scale production of the Electree+. During April 2013, the team will perform quality assurance tests on the device and make sure wireless charging works correctly.
The team plans to ship the Electree+ solar charging device to Kickstarter backers during May 2013 assuming the full $200,000 is raised. The minimum cost for an Electree with wireless charging and NFC capabilities is $260. Anyone that wants color options will have to pay at least $325 for the solar charging device.
As Samsung and Apple prepare to go to battle in a second California lawsuit, the two sides have been amending their latest lists of 'infringing' products.
Ahead of the new trial, scheduled for March 2014, Samsung has added the iPad Mini, iPad 4 and fifth generation iPod touch to a list of products it claims Apple has infringed upon, which includes the iPhone 5.
Apple, meanwhile has added newer Samsung gadgets like the Galaxy S3, Galaxy Note 2, Galaxy Tab 8.9 Wi-Fi Galaxy Tab 2 10.1, Rugby Pro and Galaxy S3 Mini.
With the trial date not scheduled until 2014, we can probably expect every new phone, tablet or PMP released by either company to be added to this lawsuit.
However, the most depressing thing about a trial date 15 months away is that we'll probably be writing and you'll probably still be reading about these two squabbling in court when 2014 rolls around.
The presence of an 4G LTE chip in the LG Nexus 4 has been making owners of the device scratch their head and giving them hope that it might eventually be hacked to work.
The revelation made by iFixit's teardown of the device has made a lot of buzz around the web and an LG spokesperson has stepped up to explain the situation.
Here's what he told Techradar.
In order to provide the best possible specification for Nexus 4, LG utilised the same powerful Qualcomm Snapdragon chipset as can be found in its 4G LTE product, namely LG Optimus G. This powerful chipset is only available with a combined processor and modem and cannot be implemented separately.
The LG representative goes on to explaining that the 4G functionality cannot be obtained just by adding the necessary software. That's because the Nexus 4 is missing "essential hardware parts" such as a signal amplifier and filter.
At the beginning of November Samsung announced they've sold more than 3 million Galaxy Note II phablets and now, merely a couple of weeks later, we get word that this number has grown to north of 5 million.
It took the Galaxy Note II just two months to achieve this impressive milestone. Part of the device's success is due to its wide availability, as Samsung has made the Note II available in 128 countries. Nevertheless, 5 million units in just 2 months is mightily impressive.
In comparison, it took the original Galaxy Note 5 months to reach the 5 million sold units mark.
The company's flagship, the Galaxy S III, is selling like hot cakes as well and recently hit 30 million shipped units since its launch back in May. Everything points out to another strong quarter for Sammy.
It's relatively simple to repair your broken touchscreen yourself
It's the modern nightmare: a slip of the hand, an absent minded moment and a split second later your life lies there shattered on the floor.
As desperately depressing as a broken phone screen may look, it may not be as terminal or as expensive as it looks.
All phones are obviously different, but many use separate elements for the touch-sensing component called the digitser and the actual LCD/OLED display.
The digitiser sits at the front and often when dropped it's this that shatters rather than the display.
A broken display usually results in rainbow effects and the display not working in sections. A broken digitizer will continue to work, just with the nasty cracks.
NOTE:Future Publishing Limited provides the information for this project in good faith and makes no representations as to its completeness or accuracy. Individuals carrying out the instructions in this project do so at their own risk and must exercise their independent judgment in determining the appropriateness of parts, equipment, sealants and other adhesives for a particular use.
1. We're going to look at replacing the HTC Desire S digitiser element, while not identical it'll be a similar process on many other models. These cost as little as £10 and should come with a suitable pry tools. You'll also probably need a jeweller screw driver set and ideally a set of Torx (star shaped) drivers sized 4 to 7.
2. Clear the work area and light it well. We're going to be dealing with tiny screws that you should arrange in order, as you remove them. To begin remove any cover, battery, SIM and SD cards.
3. For the HTC Desire S we start by removing four size 5 Torx screws from the base around the battery cover. If in doubt it's a good idea to photograph your device as you go along.
4. The HTC Desire S is pretty forgiving there's only one area that needs the pry tool and that's the top camera cover. Some devices need their entire backs removing with the pry tool. These are tricky to use but start at a corner and try and work the pry tool under the edge. Once in work along the edge popping out the clips and lift away the cover.
5. Remove two more size 5 Torx screws that are revealed. Any visible connections can also be unclipped, on the HTC Desire S there are two at the base.
6. We can now carefully "push" the main device out of the metal chassis screen first. Be careful here to bend up the lower PCB, as it'll catch on the rear of the chassis. You shouldn't need to force it at all.
7. Remove two more size 5 Torx screws at the top and remove the plastic bracket that this releases. It'll just lift away.
8. At this point we're working towards separating the display elements from the phone motherboard. On the HTC Desire S spot the two ribbon cables coming in to the side, these are the digitizer and display connections. Using the pry tool remove any tape but save this. Lift up the white locking element and using the help of a small screw driver remove the ribbons.
9. We're now free to part the display and the motherboard. As with many tablets and phones these are glued together, using the pry tool carefully and slowly start to separate the two, the glue will give you just need to take your time and work around the edge.
10. Carefully fold open the phone and disconnect the final two connecting elements. Leaving you with the display section and the motherboard section.
11. This is the hardest part of the whole tear-down. An adhesive gasket binds the digitizer to the display chassis. This needs to be heated to loosen the adhesive and using the pry tool separate the digitizer from the display. We strongly recommend using a hair dryer, too much heat will damage the display. So point it away from the centre and just at the edge of the display. You can use a hot-air gun but be extra careful, use the lowest setting and keep it moving.
12. Start on just the bottom edge or the least broken section. Use the pry tool to test how "sticky" the adhesive is and reheat, repeat until it starts coming away. Move on to the next small section and repeat. Eventually you'll lift the entire digitizer out. The process takes a while but if you can save the gasket it'll help avoid the next step.
13. If you've damaged the adhesive gasket or part has some away, this will need to be replaced with 1mm or 2mm adhesive tape designed for phones. Ebay and Amazon has vendors that sell this. If any area of the digitizer touches the display or chassis it'll short and you'll get false-positive touches, sending the touchscreen crazy.
14. Remove any protective film on either side, feed the new digitizer's ribbon through the lower hole and carefully from the base, angle it back into place firmly pushing it down to make sure the adhesive holds well. Feed the ribbon along the back of the display and reverse this process to carefully rebuild your phone.
15. Cross your fingers and press the power button. If all has gone well your phone will spring back to life and the display will be sensing your touch again.
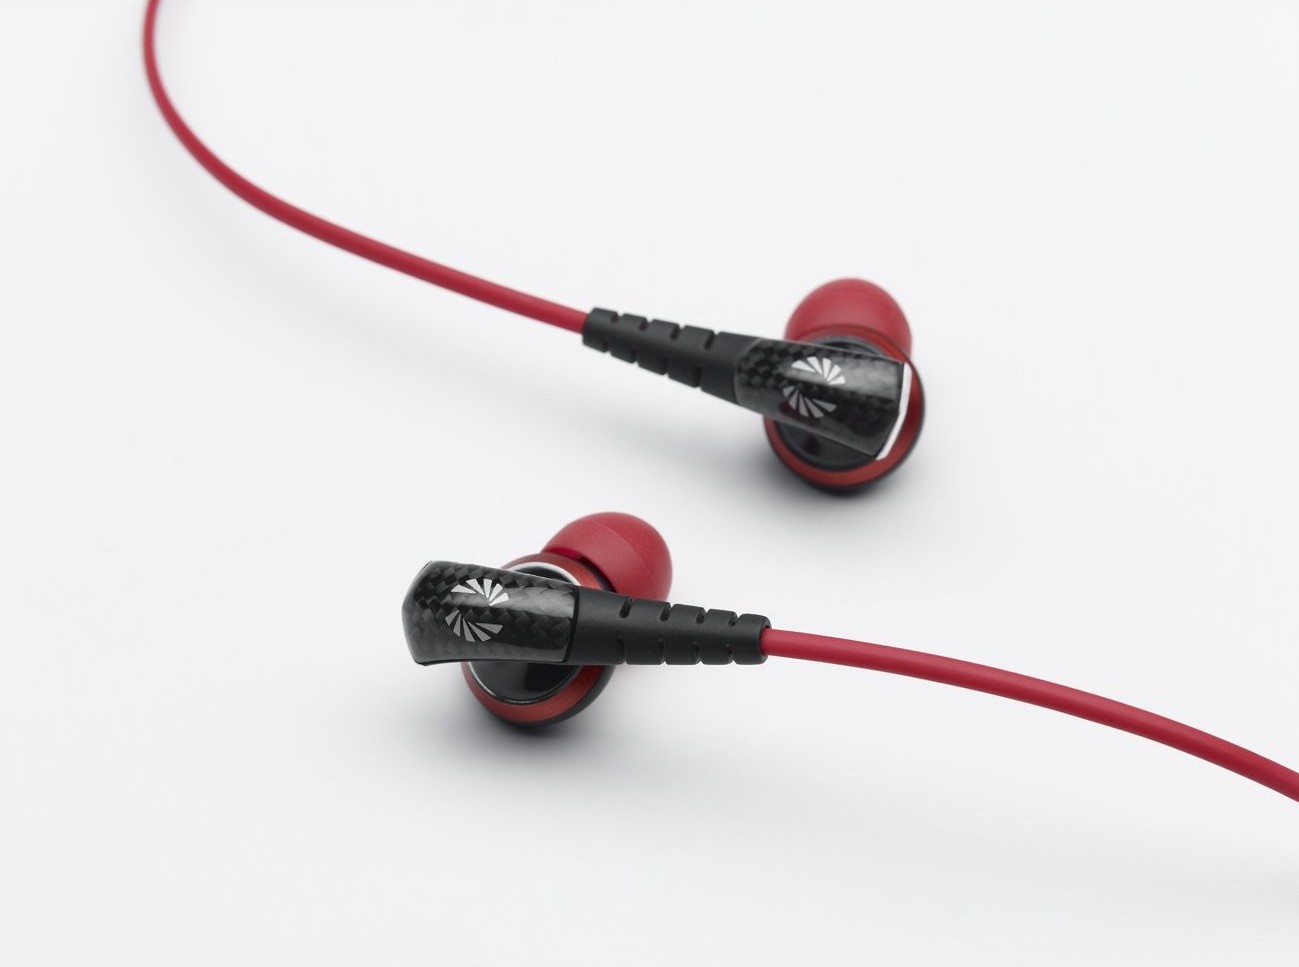
In the spirit of the holiday season, we're giving away a pair of Phiaton MS200 in-ear headphones
Phiaton recently unleashed the latest addition to its Moderna series of headphones, the MS200. As part of the Moderna series, these in-ears sport a carbon-fiber exterior and Phiaton’s bright red accents on the ear tips and cable. Flashy? Yes. But we’ve grown to like it.
The MS200 don’t skimp on features, build quality or accessories. Phiaton packs with the MS200 a cylindrical carrying case, four pairs of standard silicone eartips, a new “RightFit” silicone eartip, and a pair of Comply foam tips. All that is to say: It’s a pretty good bet you’ll find a set of eartips that suit you. If not, you might want to consider getting your ears checked. The MS200 also sport Phiaton’s three-button in-line microphone – a design we’ve found works very well.
We’ve been evaluating the MS200 in anticipation of our formal review, and while we’re going to keep the really good stuff to ourselves for now, we can say that we are very pleased with their performance.
Now for the good news: We’re giving away a pair of the MS200 to one lucky winner. All you have to do is leave a comment below telling us what you currently use for an in-ear headphone and why you’d like to switch to the MS200. The contest ends on Saturday, December 1 and we’ll announce the winner on December 3.